Salted prints as described by the Library of Congress are the earliest photographic prints made on paper. The image seems to be in the paper, not resting on the surface since the fibers are noticeable and seem to be part of the image.
View some examples online from the Library of Congress :-) very nice collection they got there...
I might add that the salted prints were generally used from ca. 1840- ca. 1860. And events such as the 4th of March 1861: Inauguration of Mr. Lincoln can be found in the online library... If that doesn't impress you here is a link to toys'r'us they got free shipping when you spend too much money on items you don't need ;-)
Soo to get started on this little adventure in old style photos. Pick out a photo you would like to use. Just to be really sure you my want to work on a copy ;-)
I picked out this one from Shenandoah from my trip out there in March (read more)

First step duplicate the background layer using the new layer from the layers menu or press CTRL+J.
With the new layer selected apply the "find edges filter" from the filter menu Stylize->Find edges.
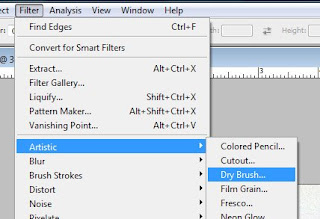
With the same layer selected apply the "Dry Brush" filter found in the filter menu Artistic->Dry Brush...
In the Dry Brush dialog use the following settings: Size=1, Detail=7 nd Texture=3.

Finally change the blend mode of the layer to Overlay and adjust the opacity to 25%. Both settings are found in the layers palette.
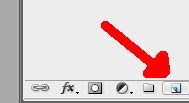
To increase contrast and get everything nice and crips (almost too much but this is an old technique we are doing) add a curves adjustment layer using the adjustment layer button in the layers palette.
For the curves layer apply a high contrast S curve. Do this by selecting high contrast in the preset menu or simply grab the line about 1 square in from the left and drag that down a bit and grab the line about 1 square in from the right and drag that up a bit forming an S curve.

Add another adjustment layer this time a levels layer (using the adjustment layer button in the layers palette) and drag the middle (gray) triangle to the right until it has the value 50 (or just type 50 in the middle text box).
 Now for some texture in the photo... Add a new layer using the new layer button in the layers palette.
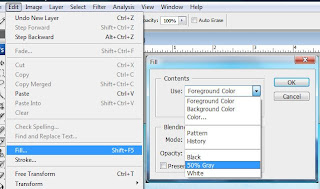
Fill the new layer with 50% gray using the Fill method found in the Edit menu. In the fill dialog change the content to use 50% gray.
To actually create the texture add a Grain filter. This is found in the filter menu Texture->Grain filter. In the grain filter dialog select Clumped grain and set intensity=33 and Contrast=50.

On the same layer apply a glass filter found in the filter menu Distort->Glass and use the settings: Distortion=18, Smoothness=7 and texture=frosted.
To finish off the texture layer set the layers blend mode to Pin light (from the drop down in the layers palette).
To get the coloring of the photo to resemple that of an old-time salt print add a Hue/Saturaion adjustment layer using the add adjustment layer button in the layers palette. In the dialog start by setting a check mark (select) the Colorize option. Then set Hue=7, Saturation=22 and keep Lightness =0.
Now we will need a second texture layer. Start this by adding a new layer using the add layer button from the layers palette.
 As with the previous layer fill the layer with 50% gray using the fill function from the Edit menu.
Once again add a grain filter to the layer but this time use the following settings: Grain type=Vertical, Intensity=2 and Contrast=50. Finish off the layer by setting the layers blend mode to Vivid light.
For a couple of finishing touches select the first texture layer (above the levels layer) and select the highlights using the Color range dialog found in the Select menu. In the dialog change the Select option to Highlights.
Fine-tune the selection by feathering the selection by 12 pixels. Select Feather from the Select->Modify menu and enter 12 in the feather selection dialog.
Once the selection is feathered (and this is the magic portion) hold down the Alt key and add a layer mask (the black button with the white circle in the lower part of the layers palette). This will create a layer mask keeping the highlights free of the texture on the initial texture layer.
If you are not entirely happy with the result and the contrast seems wayyyy to harsh you can adjust this by adjusting the 'S' curve in the curves layer (double click the layer icon in the layers palette).
Here is the finished result :-)


No comments:
Post a Comment